We finally got a few days to work on the toilet problem.
I had purchased new joker valves in case we could repair the old toilet, but it turns out the flapper valve in the toilet had become brittle. Once it broke, nothing really moved to the waste tank. Since no parts are available for the old Raritan Cricket toilet, it had to go.
Removing the old toilet
And go it did. I was very worried that removing the old toilet would create a smelly mess inside the boat.
We started by pumping the tank so that we’d be sure there wasn’t a surprise surge waiting when I disconnected the sanitary line between the old toilet and the waste tank. Actually, we pumped the tank four times: the first time was to remove anything that was lurking, and the other three pump outs were with fresh water. Since there was another boat waiting for the pump out (and it was actually another Nonsuch 26) we stopped flushing before the pump water was completely clear. Nevertheless, it was a good deal better than what we started with.
With a cleaner tank, it was time to bite the bullet and remove the old toilet. I had been visualizing for days how to do this without creating a mess and what we did worked well:
- Pump and flush the holding tank.
- Turn off the seacock that feeds raw water to the toilet.
- Disconnect the raw water hose, catching errant drips with rags.
- Remove the three lag screws that secured the old toilet to the toilet platform.
- Make a tripled large trash bag, lift the toilet a few inches, and slide the open trash bags under the toilet, being sure to bring the opening up above the waste hose.
- Disconnect the waste hose from the toilet, catching the small amount of waste that was in the hose in the tripled trash bags.
- Now that the toilet was free to remove, carefully work the trash bags up and over the top of the toilet. Carry the entire toilet to the cockpit.
- Grab another trash bag, remove the waste hose from the holding tank, and secure it in the bag.
- Discard the old toilet and waste hose in the trash.
Those steps resulted in almost no spillage at all. It all went smoothly, with little muss or odor. (Of course, we had all the ports open to get the maximum air flow through the boat, plus we wore KN95 masks!)
Installing the new toilet
The new Jabsco Twist ‘n’ Lock Compact Toilet is lighter than the old Raritan Cricket. We unpacked it and placed it in several spots on the toilet platform, testing the placement by carefully sitting on the unsecured toilet. Once we found the right spot, I carefully marked the four bolt holes with a fine-tip permanent marker rotated in each bolt hole in the toilet base.
Then it came time to drill…and that went smoothly, resulting in four clean holes.
Usually, I use a piece of old bar soap to lubricate screws that go into hard material. This time, I had Dawn dishwashing liquid. A few drops on each lag bolt did the trick, helping to ease the bolts into the fiberglass and wood of the toilet platform.
Connecting hoses
It’s very hard to measure how much new hose is needed because of the curves in the installation. The lengths were different than for the old Raritan Cricket because the raw water and discharge ports on the new toilet were located in different places.
I visualized how to make the S-shaped curve for the sanitary hose, made a mark with the permanent marker, and cut. But I forgot about the wire in the hose! Fortunately, I had a stout pair of needle nose pliers with wire cutters that did the job. Luckily, I guessed right for the sanitary hose.


With the new sanitary hose connected to the toilet and the holding tank, next came connecting the raw water line. Here is where I thought I had more to worry about, but it turns out I didn’t. I was sure that the raw water hose was 5/8″ inside diameter hose. The inlet on the Jabsco toilet called for a 3/4″ hose. What to do?
I bought a cheap plastic coupler that converted 5/8″ hose to 3/4″ hose. After removing the raw water line from the seacock, I tested the 5/8″ end of the coupler in the old hose and found that the coupler was very loose. The seacock and the hose appear to be 3/4″, not 5/8″!
I had plenty of new 3/4″ hose so we snaked new hose between the toilet and the seacock. After connecting the hose to the seacock, I once again visualized the bends the hose would need to take. I added a tiny bit of additional length for insurance and cut the hose. It turns out that the hose is slightly too long, resulting in a slight kink in the line. I’m not worried about this at this time because I plan to install an inline ball valve to make it more convenient to close the raw water line when the toilet is not being used.
Testing the new toilet
It was time to test the hoses and see if the toilet worked.
I opened the seacock and began pumping the toilet. Seawater flowed in. I pumped and flushed several times, then felt carefully around each connection for any drips. I found no drips.
The toilet works (at least with clear seawater) and nothing is leaking. Success!
Next
I’ll monitor the connections for several days, just in case the torque on the hoses causes the connections to shift a bit.
Also, the Jabsco is mounted with four bolts but I only had three on hand. Later in the day, we dropped by West Marine to pick up the fourth stainless steel lag bolt and washer. I’ll install it later.
I picked up some Marine-Tex for filling the old bolt holes. I can clean up the stains and marks on the toilet platform with a Magic Eraser and a bit of mild all-purpose cleaner.
Resolving the toilet problem finally allows us to go sailing. Unfortunately, we were too tuckered out from today’s work to do that, but we’re looking forward to feeling the wind in the sail very soon!
Final thoughts
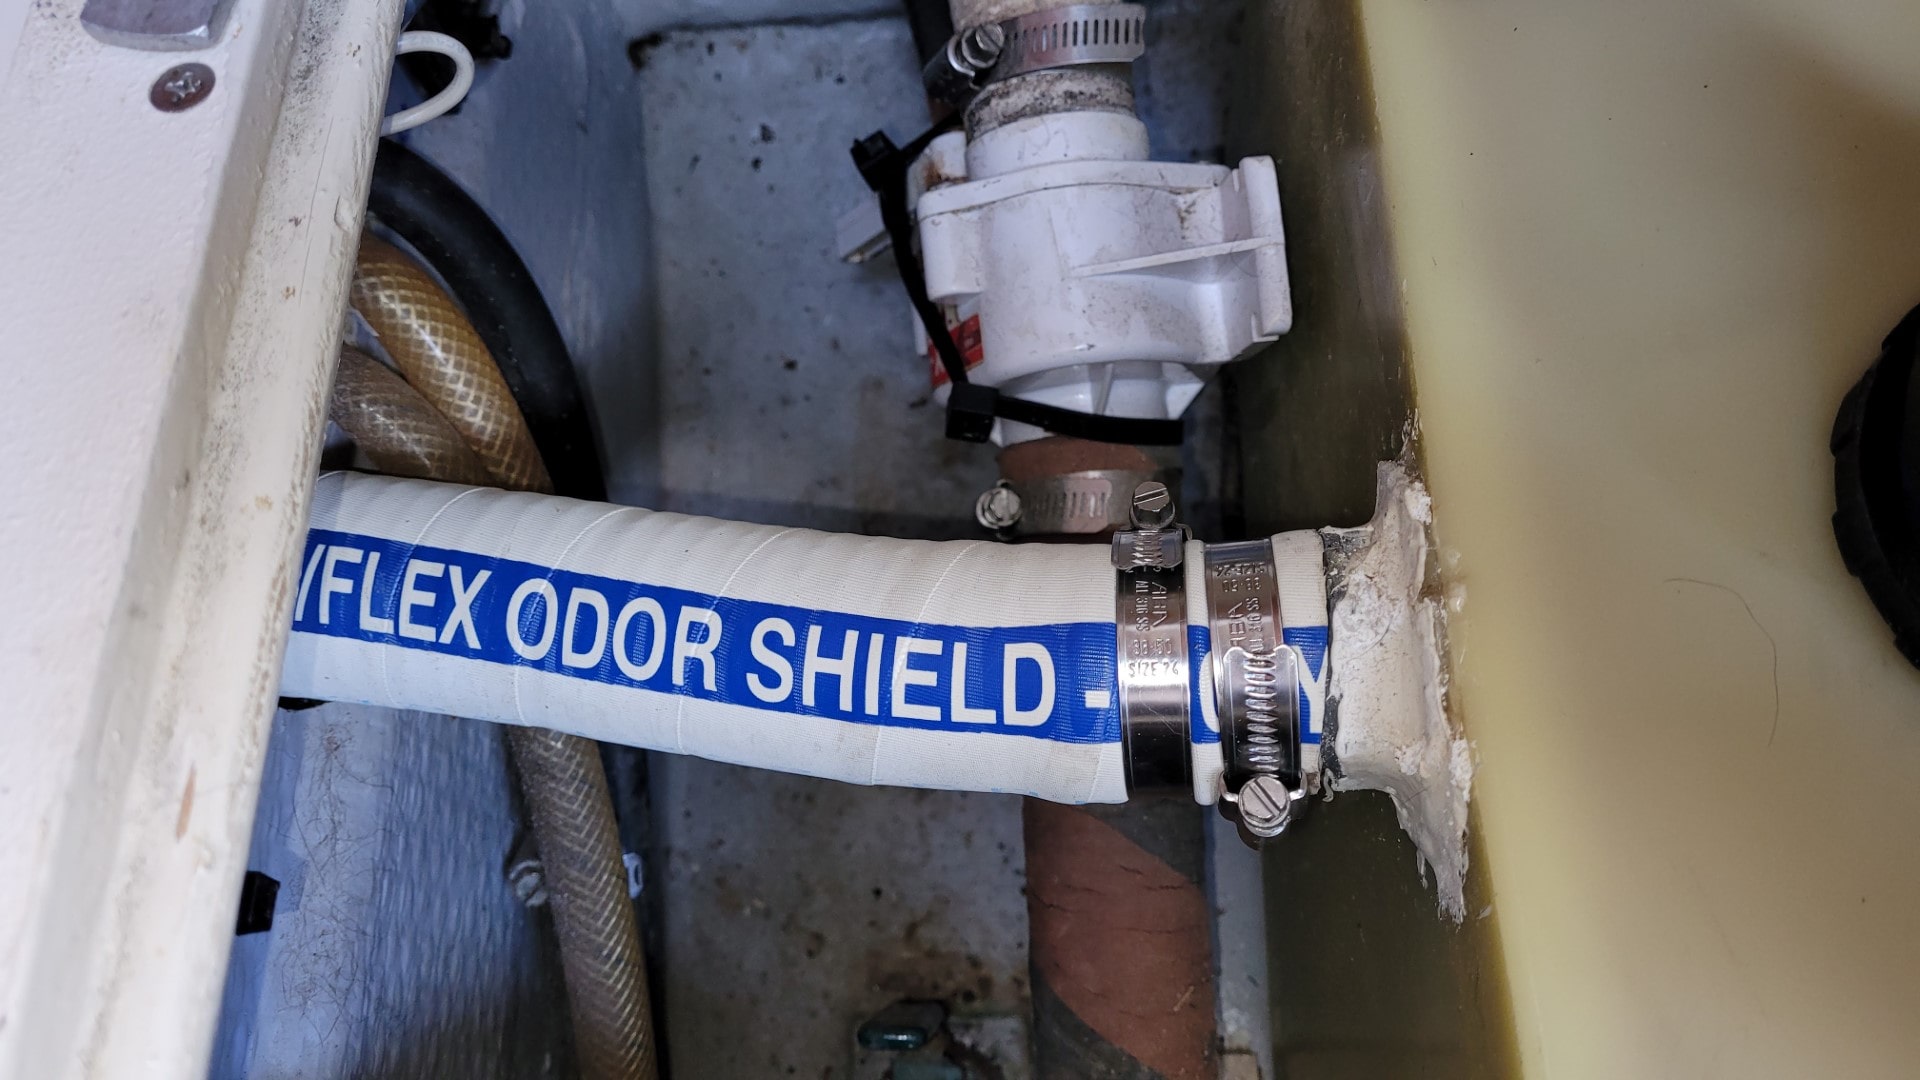
You might have noticed the white Marine-Tex epoxy around the sanitary hose fitting on the holding tank. I haven’t found in the old maintenance log why this repair was done, but I suspect the fitting was fatigued and cracking. Why? Check out the crack on the vent hose fitting:

This photo shows the old sanitary hose. The vent hose fitting at the top of the photo has a visible crack. You might be able to see how the bend in the vent hose is stressing that fitting. I’ll replace the hose soon, but in the meantime, I think I’ll do what the previous owner did: patch it with Marine-Tex until it is time to replace the tank.
Speaking of that, we continue to read about composting toilet systems on sailboats (and more). The idea of doing away with all of this nasty plumbing is appealing. The possibility of gaining additional stowage space under the starboard quarter berth is also attractive. One Nonsuch owner who went with a composting toilet system has moved all of his electrical bits into this space, another great idea!

Regarding the vent hose fitting on the holding tank, I’m going to clean up the fitting and surrounding tank surface with acetone, then use some cyanoacrylate gel to fill the crack. Once that cures, I’ll pack a ring of epoxy putty around it to strengthen the entire joint.
Cyanoacrylate gel: https://www.amazon.com/dp/B07ZMHKZQT
Epoxy putty: https://www.westmarine.com/west-marine-marine-rx-epoxy-repair-kit-2-oz.-13967443.html
And I did do exactly that: I used my finger (encased in a nitrile glove) to squeegee the cyanoacrylate gel into the crack. A few days later, I mixed up some of the West Marine branded epoxy putting and did the same thing. Both the gel and the epoxy cured hard. This fix should get me through a couple more years with this old holding tank.